Cache role
Advanced EDR enables you to assign the cache role to one or more computers on your network. These computers automatically download and store all files required by other computers with Advanced EDR installed. This saves bandwidth because not every computer has to separately download the updates they need. All updates are downloaded centrally and only once for all computers that require them.
Limitations of cache computers
For security reasons, when Advanced EDR has the cache role assigned, it can connect only to the Cytomic cloud. For this reason, there are certain limitations with regard to the items the security software can download when downloads are configured to occur through a cache node:
-
Linux computers cannot download update patches through Cytomic Patch. See Download and install patches.
-
Linux computers cannot download packages to install or update the security software. See Protection engine updates.
Cached items
A computer designated with the cache role can cache these items:
-
Signature files: Cached until they are no longer valid.
-
Installation packages: Cached until they are no longer valid.
-
Update patches for Cytomic Patch: Cached for 30 days.
Cache computer capacity
The capacity of a cache computer depends on the number of simultaneous connections it can accommodate and the type of traffic it manages (such as signature file downloads or installer downloads). A cache computer can serve approximately 1,000 computers simultaneously.
Designating a computer as a cache computer
-
Go to the Settings menu at the top of the console. Select Network services from the menu on the left. Select the Cache tab.
-
Click Add cache computer.
-
Use the search tool at the top of the window to quickly find those computers you want to designate as cache computers.
-
Select a computer from the list and click OK.
The selected computer then has the role of cache, and downloads all files required to keep its repository automatically synchronized. All other computers on the same subnet contact the cache computer to download updates.
Removing the cache role from a computer
Go to the Settings menu at the top of the console. Select Network services from the menu on the left. Select the Cache tab.
Click ![]() next to the computer you want to remove from the list.
next to the computer you want to remove from the list.
Specifying the storage drive
You can configure the Advanced EDR agent to store cached items on a specific drive of the cache computer. To specify the cache drive:
-
Go to the Settings menu at the top of the console. Select Network services from the menu on the left. Select the Cache tab.
-
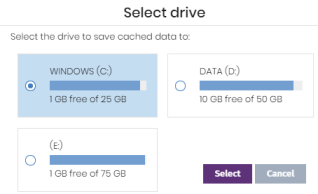
Select a computer from the list of cache computers. Click the Change link. A dialog box opens and shows the available drives.
-
The following information is shown for each drive: volume name, mapped drive, free space, and total space.
-
To view the space on a drive, point the mouse at the relevant bar. A tooltip shows the percentage of used and free space.
-
Only drives with 1 GB or more of free space are available to store cached items. Select the drive where you want to store the cached items and click the Select button. Advanced EDR starts to copy the cached items. When the process is complete, the items are deleted from their original location.
You can only select a drive on a computer which has reported its status to the Advanced EDR server. If the drive has not reported its status, the drive that stores the Advanced EDR installation files is selected by default. After the status has been reported, the Change link for the cache computer is shown, and you can select the storage drive. It might take several minutes for a computer to report its status.
If there is not enough free space or a write error occurs when you select the drive, an error message appears below the cache computer and indicates the cause of the problem.