Managing user accounts
A user account consists of multiple pieces of information that are generated when the account is created:
-
Account login email address: Identifies the users accessing the console.
-
Account password: Allows or prevents access to the management console.
-
Assigned role: Determines which computers the account user can manage and the actions they can take.
Creating the first user account
The procedure to create the first user account is different from the steps to create subsequent accounts. The first user account always has the Full Control role assigned. This role enables you to perform any action through the console. You cannot delete or modify this account.
Receive the welcome email
-
After you purchase Advanced EDR, you receive an email message from Cytomic.
-
Click the Click here link in the message to access the website from which you can create the first user account.
Complete the Create your Cytomic account form
-
Enter your email address and click Create. You will receive a new email message at the email address you specified in the form to activate the account you created.
Activate the user account
-
Click the activation button in the message you received to verify the email address you provided when you created the user account. If the button does not work, copy and paste the link included in the message into your browser. The Cytomic Account page opens.
-
Enter the password for the account. The password length must be at least 8 characters. The password must contain at least one number and at least one letter.
-
Choose the country. Click Activate account. The One second and you are done page opens.
-
Enter your first and last name, date of birth, phone number, and address. Click Save. You can skip this step by clicking Not now. The Cytomic Central end-user license agreement opens.
-
Click Accept and continue. The Cytomic Central page opens, from which you can access all services purchased from Cytomic.
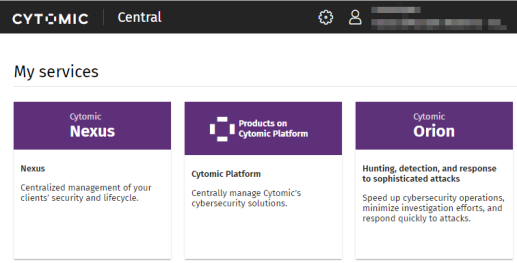
-
To access the Advanced EDR console, click the Advanced EDR tile in My services. The first time you access the console, a wizard opens that prompts you to accept the license and data processing agreements.
-
On the License agreement page, click the Accept and continue button.
-
On the Data processing agreement page, click Go to data processing agreement.
-
On the Data processing agreement page, click Accept. The Advanced EDR console opens.
-
After the process is complete, the WatchGuard user account can access the Advanced EDR console. See Access to the web console.
Creating subsequent user accounts
After you have created the first user account, you can access the Advanced EDR management console, from which you can create all other user accounts you may need.
-
Make sure the user has the Manage users and roles permission assigned. See Understanding permissions.
-
Select Settings in the menu at the top of the console. Select Users in the side menu.
-
Select the Users tab. A page opens that shows a list of all users created in the management console.
-
Click Add. The Add user page opens.
-
Enter the console user’s email address in the Login email field. Enter a description if needed.
-
Choose a role for the user account. See Understanding permissions.
-
Click Save. Advanced EDR sends an email to the specified email address so that the user can generate an access password and accept the terms of the license and data processing agreements.
Before you begin this procedure, make sure you have logged out of the WatchGuard Portal and the Advanced EDR console and you have closed your web browser.
Editing the personal details for a user account
-
In the management console, click the icon in the upper-right corner of the page. A drop-down menu appears.
-
Select Set up my profile.
Cytomic Central
-
The Cytomic Account page opens.
-
In the left menu, select Profile. Fill the form with the personal details for the account.
-
Click Save. The changes are stored on the Cytomic server.
Editing the email address or password for a user account
-
In the management console, click the icon in the upper-right corner of the page. A drop-down menu appears.
-
Select Set up my profile.
Cytomic Central
-
The Cytomic Account page opens.
-
In the left menu, select Login. Click the Change email address or Change password links. A page opens that prompts you to validate the old data and enter the new one.
-
Click Change.
Deleting or blocking user accounts
-
Make sure the user has the Manage users and roles permission assigned. See Understanding permissions.
-
Select Settings in the menu at the top of the console. Select Users in the side menu.
-
Select the Users tab. A page opens that shows a list of all users created in the management console.
-
Click the
 icon for the user account you want to delete.
 -
To temporarily disable access from a user account to the web console, click the account and click the Block this user toggle. Access from the account to the management console is denied. If the account is currently logged in, it is logged out immediately. Also, email alerts are no longer sent to the email addresses configured in the account settings.
Enabling two-factor authentication
Advanced EDR supports the two-factor authentication (2FA) standard to add an additional layer of security beyond that provided by the ‘user-password’ basic pair. This way, when you try to access the web console, you are prompted to enter an additional authentication item: a code that only the account owner has. This is a random code that is generated on a specific device, typically the Advanced EDR administrator’s personal smartphone or tablet.
Requirements for enabling 2FA
-
Access to a personal smartphone or tablet with a built-in camera.
-
Download the WatchGuard AuthPoint free app (or similar) from:
Enabling 2FA
-
In the management console, click the icon in the upper-right corner of the page. A drop-down menu appears.
-
Select Set up my profile.
Cytomic Central
-
The Cytomic Account page opens.
-
Select Login from the side menu. Click the Enable link in section Two-factorauthentication. The Synchronization using an authentication app window opens.
-
The first time that you use the WatchGuard AuthPoint app on your mobile device, tap Activate. If you have used it before, tap the QR code icon in the upper-right corner of the window. The mobile device camera opens.
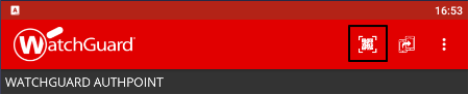
-
Point the camera at the QR code in the Advanced EDR console. A new entry is added to WatchGuard AuthPoint and a token is generated every 30 seconds.
-
Enter the code generated by WatchGuard AuthPoint in the Advanced EDR console to link the device to the user account. Click Verify. A window opens that shows the message Two-factor authentication is enabled.
-
Click OK.
Accessing the web console from Cytomic Central using an account with 2FA enabled
-
Go to https://www.pandacloudsecurity.com/PandaLogin/. Enter your user name and password. Click Log in.
-
Enter the verification code generated by WatchGuard AuthPoint on your mobile device. Click Verify. The Cytomic Central page opens.
Forcing all console users to use 2FA
The user account with which you enforce the use of 2FA must have the Manage users and roles permission assigned and full visibility into the IT network. See Managing roles and permissions
-
Select Settings from the menu at the top of the console. Select the Security tab.
-
Select the option Require users to have two-factor authentication enabled to access this account.
-
If the user account with which you force all console users to use 2FA does not have two-factor authentication enabled, a warning message is displayed prompting you to access your Cytomic Account and enable the feature. See Enabling 2FA.