Generating the installation package and manual deployment
-
Select the Computers menu at the top of the management console. Click the Add computers button in the upper-right corner of the page. A window opens with all platforms supported by Advanced EDR.
-
Click the Windows icon, both for devices with an x86 or ARM processor. The Windows window opens.
-
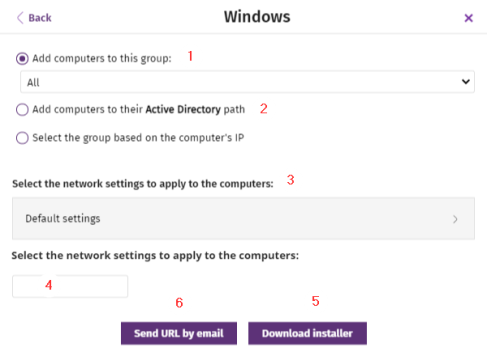
Select the group that the computer integrates into in the folder tree (for more information about the different types of groups, see Group types:
The security policies assigned to a computer depend on the group it belongs to. If you have selected Add computers to their Active Directory path, and the administrator of the company’s Active Directory moves a computer from one organizational unit to another, that change is replicated to the Advanced EDR console as a group change. Consequently, the security policies assigned to that computer might also change without the administrator of the web management console noticing.
To integrate the computer into one group or another based on its IP address, click Select the group based on the computer’s IP (3) and select the group into which it will be integrated depending on its IP address. See Integrating computers based on their IP address.
-
To configure network settings that are different from those assigned to the group which the computer will join, click Select the network settings to apply to the computers (4) and choose a network settings profile from the drop-down menu: Initially, all the settings profiles that are applied to a computer upon integration into the console are the profiles that are assigned to the console group it belongs to. However, to avoid connectivity failures and prevent the computer from being inaccessible from the console because of incorrect network settings, you can set an alternative profile. For more information about how to create network settings profiles, see Configuring the agent remotely.
-
Native groups and IP groups: The Select the network settings to apply to the computers (4) menu shows the network settings assigned to the group selected in Add computers to this group (1).
-
Active Directory groups: The Select the network settings to apply to the computers (4) menu shows the network settings assigned to the Active Directory group selected in the group tree. If no Active Directory group was selected before clicking Add computer, you need to configure network settings.
-
-
To prevent the installer from being used after a certain date, click the Indicate whether you want the installer to expire after a specific date text box and select a date in the calendar.
-
To send the installer to the target user by email:
-
Click the Send URL by email button (6). The email app installed by default on the administrator’s computer opens with a predefined message containing the download URL.
-
Add recipients to the message and click Send.
-
The user that receives the message must click the URL from the target device to download the installer.
-
-
To download the installation package and share it with the users on the network, click Download installer (7).
Installing the downloaded package
-
Double-click the package and follow the installation wizard. Throughout the process, a window is displayed indicating the progress of the task.
-
If there are not enough licenses to allocate one to a computer in the installation process, a warning is displayed on screen. Nevertheless, the computer in question is integrated into the management console but is not protected until sufficient licenses are available.
After it is installed, the agent performs a series of checks automatically:
-
Agent integration into Cytomic: The agent sends information from the computer where it is installed to the Cytomic cloud for integration into the platform.
-
Protection module installer download: The agent downloads and installs the protection module.
-
Signature file download: The agent downloads the known malware signature file.
-
Settings download: The predetermined settings and those created by the administrator are downloaded and applied.
-
Connectivity check to the Cytomic cloud: If connectivity fails, the error type is reported in the following places:
-
The agent installation console: An error message is displayed along with the URLs that could not be accessed. Click the Retry button to perform a new check.
-
The Windows Event Viewer (Event Log): An error message is displayed along with the URLs that could not be accessed.
-
The web console: An error message is displayed along with the URLs that could not be accessed.
-
Integrating computers based on their IP address
Advanced EDR enables IP address ranges and individual IP addresses to be assigned to groups. Computers with an IP address in the group’s range are automatically included in it when installed. See Creating and organizing groups.
The purpose of this feature is to save time for administrators by automatically organizing newly integrated computers into groups. Advanced EDR takes the following steps to integrate a new computer into the service:
-
If you select Select the group based on the computer’s IP, Advanced EDR searches all IPs associated with the group and child groups you select.
-
If a single IP address is found, the computer moves to the relevant group.
-
If multiple IP groups match the computer IP address, the group that is deepest in the tree is selected. If there are multiple groups at the same level with IP addresses that match the computer IP address, the last one is selected.
-
If no matches are found, the computer moves to the selected group. If the selected group does not exist when the computer is integrated, it moves to the All group.
After the solution places a computer in a group, if you change the IP address for the computer, the computer does not automatically move to another group. If you change the IP addresses assigned to a group, the computers in the group are not automatically reorganized.