File searches
Requirements for conducting searches
To search for files with specific contents on the computers on the network, the following requirements must be met:
-
The user account used to launch the search from the web console must have a role with the permission Search for data on computers. See Accessing, controlling, and monitoring the management console for more information about roles.
-
The computers targeted by the search must have a Cytomic Data Watch license assigned.
-
The computers targeted by the search must have a Cytomic Data Watch settings profile assigned with the option Allow data searches on computers enabled. See Cytomic Data Watch settings
Searches widget
This is the entry point for the file search feature. It enables searches to be viewed and managed.
To access the Searches widget, go to the Status top menu. From the side panel, select Cytomic Data Watch
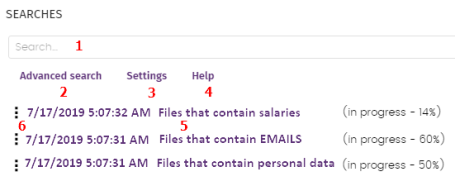
The widget has the following features:
-
(1) Text box to enter search criteria. See Search syntax for a description of the search terms permitted by Cytomic Data Watch.
-
(2) Advanced search: Defines the scope of the search.
-
(3) Settings: Access to the Cytomic Data Watch settings profiles. For more information, see Cytomic Data Watch settings.
-
(4) Help: Link to a Cytomic support article, showing updated information about the Cytomic Data Watch search syntax.
-
(5) Previous searches: Searches that have been used before and that can be relaunched if required.
-
(6) Search context menu: Enables you to edit the name of the search and its parameters, as well as relaunching and deleting it.
Search requirements and properties
To run searches successfully, the following requirements must be met:
-
The user account used to launch the search from the web console must have a role with the permission Search for data on computers. See Accessing, controlling, and monitoring the management console for more information about roles.
-
The computers targeted by the search must have a Cytomic Data Watch license assigned.
-
The computers targeted by the search must have a Cytomic Data Watch settings profile assigned with the option Allow data searches on computers enabled.
Search properties
-
The maximum number of simultaneous searches in the management console per user account is 10. After this number, an error message appears.
-
The maximum number of searches saved per user account is 30. After this number, an error message appears.
-
The maximum number of results in total for each search is 10,000 records. Results in excess of this number are not displayed.
-
The maximum number of results per computer is 10,000 / number of computers on which the search is run. So, if you search on a network of 100 computers, the maximum number of results displayed is 10,000 / 100 = 100 results per computer.
-
The minimum number of results displayed per computer, regardless of the number of computers on the network, is 10.
-
The maximum number of computers on which searches can be run simultaneously is 50. If the total number of computers in the search is greater, they are queued until the searches in progress are completed.
Normalization process
The normalization process does not affect the entity detection process.
Cytomic Data Watch applies a number of rules to the data obtained from the indexing process in order to homogenize it. Because the searches run by administrators are performed on the normalized data, it is necessary to know these rules as they may affect the results shown in the console.
String conversion to lowercase letters
Before a string is stored in the database, it is converted to lowercase letters.
Separating characters
Cytomic Data Watch detects the following special characters as separators between words. These characters are removed from indexes unless they are part of an entity.
-
Carriage return: \r
-
Line break: \n
-
Tab key: \t
-
Characters: " : ; ! ? - + _ * = ( ) [ ] { } , . | % \ / ’
For example, “Cytomic.Data(Watch” is stored as three separate words without the punctuation characters: “cytomic”, “data”, and “watch”.
Entity normalization
The entity normalization process follows independent rules:
Entity normalization examples
-
“1.42.67.116-C” is stored as IDCARD entity “14267116C”.
-
“192.168.1.1” is stored as IP entity “192.168.1.1”.
-
“Sesame Street 5 1st Floor” is stored as “sesame”, “street”, “floor” if the indexing method is Text only or as “sesame”, “street”, “5”, “1”, “floor” if the indexing method is All.
Creating searches
Creating a free search
-
Click the Status menu at the top of the console. Select Cytomic Data Watch from the side panel.
-
In the Searches widget text box, enter the search terms, in accordance with the search syntax described in section Search syntax.
-
Click the
 icon or press Enter.
After you have entered the search, the Search results page opens. See Previous searches for more information about how to edit previous searches.
Creating a guided search
-
Click the Status menu at the top of the console. Select Cytomic Data Watch from the side panel.
-
Click the Advanced search link.
-
Select Guided search.
-
Configure the search parameters.
Advanced search parameters:
| Parameter | Description |
|---|---|
|
Search name |
Type a name for the search. |
|
Search for files with |
Enter the content to search for. There are three text boxes:
|
|
Personal data |
Select the relevant checkboxes to specify the entities that the PII files you want to find must include.
|
|
Narrow search to |
Computers:
|
|
Cancel the search automatically |
Select the search timeout period for computers that are turned off or offline. |
Previous searches
Both free searches and guided searches are saved so they can be launched quickly in the future.
After a new search has been created, it appears in the Searches widget along with the date and time it was created, as well as the name and a key indicating the status (In progress, Canceled) or no status (Finished).
Changing the name of a previous search
Click the context menu of the search (6 in Searches widget) and select Change name.
Creating a copy of a previous search
To duplicate a previous search, click the context menu of the search (6 in Searches widget) and select Make a copy. A page is displayed with the search settings and the search name changed to ‘Copy of’.
Launching a previous search
Click the context menu of the search (6 in Searches widget) and click Relaunch search. The status of the search changes, specifying the percentage of the task completed.
Canceling and deleting previous searches
Click the context menu of the search (6 in Searches widget). Click Cancel to stop the search and Delete to cancel the search and remove it from the Searches widget.
Editing a previous search
Click the context menu of the search (6 in Searches widget) and select Edit search. The Advanced search page opens, where you can edit the search parameters.
Viewing search results
To see the results of a search, go to the Search results list, either by:
-
Clicking on a previous search.
-
Creating a new search.
The list shows the computers that contain the search term entered, along with the name of the file detected and other information.
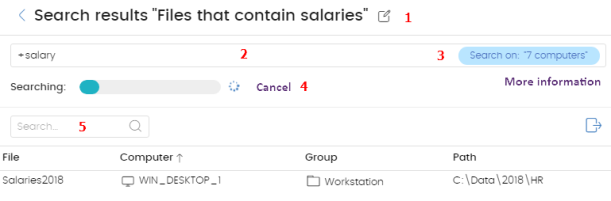
List header
Quick search parameters:
-
(1)
 icon: Change the search name.
 -
(2) Text box: Search content.
-
(3) Search on: ‘x computers’: Opens the Advanced search page to narrow the search.
-
(4) Searching: Search status (In progress, Canceled).If the search has not begun or is complete, no status is indicated.
-
(5) Search text box: Filters the results by computer name.
List fields
| Field | Comment | Values |
|---|---|---|
|
File |
Name of the file found. |
Character string |
|
Computer |
Name of the computer where the file was found. |
Character string |
|
Advanced EDR group to which the computer belongs. |
Character string |
|
|
Path |
Path to the file on the storage device. |
Character string |
Fields displayed in the exported file
| Field | Comment | Values |
|---|---|---|
|
File |
Name of the file found. |
Character string |
|
Computer |
Name of the computer where the file was found. |
Character string |
|
Group |
Advanced EDR group to which the computer belongs. |
Character string |
|
Path |
Path to the file on the storage device. |
Character string |
|
Personal ID numbers |
Indicates whether any personal ID numbers (national ID card numbers or similar) were found in the file. |
Boolean |
|
Passport numbers |
Indicates whether any passport numbers were found in the file. |
Boolean |
|
Credit card numbers |
Indicates whether any credit card numbers were found in the file. |
Boolean |
|
Bank account numbers |
Indicates whether any bank account numbers were found in the file. |
Boolean |
|
Driver’s license numbers |
Indicates whether any driver’s license numbers were found in the file. |
Boolean |
|
Social security numbers |
Indicates whether any social security numbers were found in the file. |
Boolean |
|
Email addresses |
Indicates whether any email addresses were found in the file. |
Boolean |
|
IPs |
Indicates whether any IP addresses were found in the file. |
Boolean |
|
First and last names |
Indicates whether any first and last names were found in the file. |
Boolean |
|
Addresses |
Indicates whether any postal addresses were found in the file. |
Boolean |
|
Phone numbers |
Indicates whether any phone numbers were found in the file. |
Boolean |
Search syntax
Cytomic Data Watch enables you to perform flexible searches for files by content using plain text and parameters to narrow the scope of the results.
Syntax allowed in quick searches
-
Word: Searches for ‘word’ in the document content and metadata.
-
WordA WordB: Searches for ‘worda’ or ‘wordd’ (logical operator OR) in the document content.
-
“WordA WordB”: Searches for ‘worda’ and ‘wordb’ consecutively in the document content.
-
+WordA +WordB: Searches for ‘worda’ and ‘wordb’ in the document content.
-
+WordA -WordB: Searches for ‘worda’ but not ‘wordb’ in the document content.
-
Word*: Searches for all words that start with “word”.. The wildcard ‘*’ is only allowed at the end of the search term.
-
Wo?rd: Searches for words that begin with ‘wo’ and end in ‘rd’ and have a single alphabet character in between. The character ‘?’ can be located at any point in the search string.
-
Word~: Searches for all words that contain the string 'word’.
Syntax allowed in guided searches
Guided searches do not allow the ‘+’ or ‘-’ characters. Instead, search words are entered in different text boxes. If the characters ‘+’ or ‘-’ are used, they are considered part of the search term.
Available entities
To narrow the scope of results, Cytomic Data Watch supports the use of qualifiers to indicate entities or file characteristics in quick and advanced searches. Qualifiers are:
| Qualifier | Description |
|---|---|
|
PiiType |
Specifies the type of PII data detected in the file. |
|
HasPii |
Indicates that the file has PII data. |
|
Filename |
Indicates the name of the file. |
|
FileExtension |
Indicates the file extension. |
The values allowed in these qualifiers are:
| Qualifier | Description |
|---|---|
|
PiiType:BANKACCOUNT |
Files that contain any bank account numbers. |
|
PiiType:CREDITCARD |
Files that contain any credit card numbers. |
|
PiiType:IDCARD |
Files that contain any personal ID numbers (national ID card numbers or similar). |
|
PiiType:SSN |
Files that contain any social security numbers. |
|
PiiType:IP |
Files that contain any IP addresses. |
|
PiiType:EMAIL |
Files that contain any email addresses. |
|
PiiType:PHONE |
Files that contain any phone numbers. |
|
PiiType:ADDRESS |
Files that contain any postal addresses. |
|
PiiType:FULLNAME |
Files that contain any first names and last names. |
|
PiiType:PASSPORT |
Files that contain any passport numbers. |
|
PiiType:DRIVERLIC |
Files that contain any driver’s license numbers. |
|
HasPii:True |
Files that contain any PII data. |
|
Filename:’file name’ |
Files with the specified file name. |
|
Fileextension:’file extension’ |
Files with the specified file extension. |
Syntax for searches with entities
Entities can be used in all search types (quick or guided) alone or combined with other character strings.
-
PiiType:IDCARD: Searches for files with Personal ID numbers detected.
-
+PiiType:IDCARD +’Company’: Searches for files containing a list of personal ID numbers in the company (with the character string ‘Company’).
-
+Filename:scan* +fileextension:docx -PiiType:fullname: Searches for scan files (files whose name starts with ‘scan’) in Word (.docx extension) and that are not officially signed (no Fullname -first names and last names - were detected).
Tips for building searches that are compatible with the normalization process
-
It is preferable to use lowercase letters.
-
Bear in mind the settings you have previously configured regarding the type of content to index and excluded files, as those settings determine the number of results returned in searches.
-
To search for bank account numbers, credit card numbers, personal ID numbers, social security numbers, passport numbers, or driver’s license numbers do not use separating characters.
-
To search for IP addresses and email addresses, enter them as they are.
-
To search for phone numbers, remove any separating characters and enter the country code if necessary without the ‘+’ sign.
-
To search for postal addresses, do not use the numeric characters.