Creating a task from the Tasks area
-
From the top menu, select Tasks. A list opens and shows all created tasks and their status.
-
Click the Add task button. From the drop-down menu, select a task type. A page opens for you to enter the task details. This page is divided into multiple areas:
-
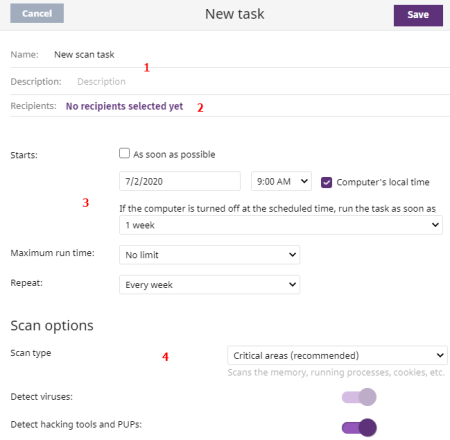
Overview (1): Task name and description.
-
Recipients (2): Computers that receive the task.
-
Schedule (3): Task schedule (day and time the task runs).
-
Settings (4): Specify the actions the task must take. This section varies based on the task type and is described in the documentation associated with the related module.
-
Task recipients (2)
To access the computer selection page, you must first save the task. If you have not saved the task, a warning message is shown.
-
In the Recipients section, click the No recipients selected yet link. A page opens where you can select the computers that you want to receive the configured task.
-
Select the types of computers that will receive the task: Workstation, Laptop, Server, or Mobile device. The type of computer that can receive a task depends on the task to run.
-
Click the
 button to add individual computers or computer groups. Click the
  button to remove them.
If you are configuring a patch installation task and want to send it to test computers only, enable the Run the task only on test computerstoggle. This option is applicable only to service providers who have CYTOMIC Nexus. For more information, see Cytomic Patch features
-
On the Edit task page, click the View computers button to view the computers that will receive the task.
Task schedule and frequency
You can configure these parameters:
-
Starts: Indicates the task start date/time.
| Value | Description |
|---|---|
|
As soon as possible (selected) |
The task runs immediately provided the computer is available (turned on and accessible from the cloud), or as soon as it becomes available within the time interval specified in the If the computer is turned off section |
|
As soon as possible (cleared) |
The task runs on the date selected in the calendar. Specify whether the time is based on the computer local time or the Advanced EDR server time. |
|
If the computer is turned off |
If the computer is turned off or cannot be accessed, the task does not run. The task scheduler enables you to establish the task expiration time, from 0 (the task expires immediately if the computer is not available) to infinite (the task is always active and waits indefinitely for the computer to be available).
|
-
Maximum run time: Indicates the maximum time that the task can take to complete. After that time, the task is canceled returning an error.
| Value | Description |
|---|---|
|
No limit |
There is no time limit for the task to complete. |
|
1, 2, 8, or 24 hours |
There is a time limit for the task to complete. After that time, if the task has not finished, it is canceled returning an error. |
-
Frequency: Set a repeat interval (every day, week, month, or year) from the date specified in the Starts: field.
| Value | Description |
|---|---|
|
One time |
The task runs only once at the time specified in the Starts: field. |
|
Daily |
The task runs every day at the time specified in the Starts: field. |
|
Weekly |
Use the checkboxes to select the days of the week on which the task must run, at the time specified in the Starts: field. |
|
Monthly |
Choose an option:
|
Lower versions of the security software
If the recipient computers have a lower version of the security software installed, they might not correctly interpret frequency settings. Computers with lower versions of the security software interpret the task frequency settings as follows:
-
Daily tasks: Unchanged.
-
Weekly tasks: Recipient computers ignore the days selected in the task by the administrator in the latest software. The first run occurs on the specified start date and then runs again every 7 days.
-
Monthly tasks: Recipient computers ignore the days selected in the task by the administrator in the latest software. The first run occurs on the specified start date and then runs again every 30 days.
Task publication
After you create and configure a task, it appears in the list of configured tasks. The status shows as Unpublished and it is not yet active.
To publish a task, click the Publish button. The task is added to the Advanced EDR task scheduler, which runs it based on its settings.