Enabling supervised mode and deploying the iOS agent from a third-party MDM solution
The various MDM solutions available on the market support different methods to enable supervised mode on iOS devices. See the documentation to enable supervised mode on the iOS devices enrolled into your MDM solution.
To set WatchGuard Mobile Security as the app in charge of filtering web traffic on iOS devices, the MDM solution that you use must allow import of external configuration profiles. See the documentation for your MDM solution for information about how to enable supervised mode on enrolled iOS devices.
Deploying the WatchGuard Mobile Security app using a third-party MDM solution
The procedures in this section associated with the MDM software vary based on the vendor you select. See your product help for more information.
-
Select the Computers menu at the top of the management console. Click the Add computers button. A window opens that shows all platforms supported by Advanced EPDR.
-
Click the iOS icon. The iOS window opens.
-
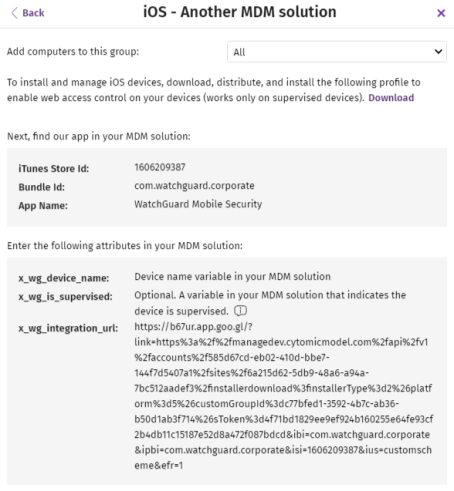
Click the Installation using another MDM solution link. The iOS - Another MDM solution window opens with the information the MDM solution needs to integrate the device.
-
Click the Download link to get the profile that will set WatchGuard Mobile Security as the app configured to filter web traffic on the target iOS devices. An XML file with the .mobileconfig extension downloads to your computer.
-
Import the .mobileconfig file into the third-party MDM solution and push it to the iOS devices where you want to enable URL filtering.
-
In the third-party MDM solution, import the WatchGuard Mobile Security app directly from the Apple Store. To do this, use the iTunes Store Id, Bundle Id, or App Name fields in figure Window with the integration parameters for the third-party MDM solution, or the search features included in the MDM solution.
-
Associate and define the parameters x_wg_device_name, x_wg_integration_url, and x_wg_is_supervised in the WatchGuard Mobile Security app imported into the third-party MDM solution repository. The information contained in these parameters is sent along with the WatchGuard Mobile Security app when you push the app to the devices managed with the MDM solution.
-
x_wg_device_name: Contains the device name that will be shown in the Advanced EPDR console. In the x_wg_device_name parameter, enter the variable used by the MDM solution to represent the name of the device that will receive the WatchGuard Mobile Security app.
-
x_wg_integration_url: Contains the URL that points to the information that WatchGuard Mobile Security needs to integrate into the group chosen by the Advanced EPDR administrator. Copy the content of the x_wg_integration_url attribute shown in the Advanced EPDR console to the parameter defined in the MDM solution.
-
x_wg_is_supervised: Tells WatchGuard Mobile Security whether the device where it is going to be installed is supervised or not. If your MDM solution has a variable that enables you to dynamically set the content of this parameter, add it. Otherwise, do not add the parameter. WatchGuard Mobile Security will try to determine on its own whether it is running on a managed device or not.
-
Each MDM solution uses different variable names and syntaxes. See your product documentation for this information.
Use variables with the x_wg_device_name and x_wg_is_supervised parameters. If, instead of the variable that represents the device name, you enter a device name, all the mobile devices that receive WatchGuard Mobile Security will be shown with the same name in the Advanced EPDR console.
-
Push the WatchGuard Mobile Security app from the MDM solution to the devices that you want to protect. After a few minures, the app is installed silently.
-
After the app is installed, tap it to run it for the first time. The message "WatchGuard Mobile Security" Would Like to Send You Notifications appears.
-
Tap the Allow button. The device is added to the Advanced EPDR console and the configuration process is complete.