Analysis Console Elements
The web console provides a number of resources for you to configure the service:
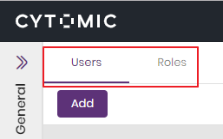
Tab Menu

The tab menu provides shortcuts to frequently used tools, which open in the central panel.
To manage the tab menu:
-
To select a tab, click its name.
-
To create a new tab in the menu, click the
icon.
-
To close a tab:
-
Click the
icon for the tab you want to close. If the tool stores data and you have unsaved changes, a dialog box opens that prompts you to save them.
-
Click Save. The tab closes.
-
-
To sort the tab menu:
-
Select the tab you want to move.
-
Drag the column to a new location.
-
Some tab menus are not configurable and look like the menu shown in the Fixed tab menu figure.
Sub-panels
When the central panel contains different types of information, the page is divided into sub-panels.
You can maximize sub-panels to take up the whole page.
-
To expand a sub-panel, click
.
-
To collapse a sub-panel, click
.
Some sub-panels have their own search and filter tools, which affect only the data in the sub-panel. See Search Tools.
List Configuration Tools
Depending on the list, some of these tools might not be available:
Change Time Zone
To change the time zone for the items in a list regardless of the time zone set in the general settings (see Settings Area):
-
Click
. The time zone list opens.
-
Select a time zone. The list updates automatically.
Refresh List
Click the icon.
Select All Rows in a List
To select both visible and non-visible rows, select the check box in the list header.
The check boxes can have these icons:
| Icon | Description |
|---|---|
|
|
Unselected row. |
|
|
Selected row. |
|
|
All rows in the list or group are selected. |
|
|
Some (not all) rows in the list or group are selected. |
Sort Columns
To change the order of columns in a list:
-
Select the column you want to move.
-
Drag the column to a new location.
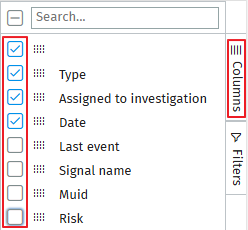
To change the order of columns in a list with the sidebar:
-
From the sidebar, select Columns. A list opens that shows all columns as they appear from left to right in the list.
-
Click the
 icon for a column.
 -
Drag the column to a new location. The columns change order in the list.
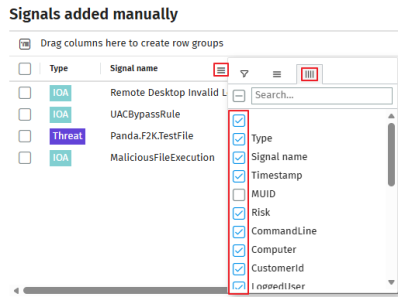
Show and Hide Columns
To show or hide columns in a list through the list context icon:
-
Point to a column name in the list. The context icon appears (
 ).
). -
Click the icon. A drop-down menu opens that shows several tabs.
-
Select the
 tab. A list opens that shows the names of all columns in the list.
 -
To filter the columns in the list, in the Search text box, type the name of a column. The column list updates automatically.
-
Select or clear the check boxes for the columns you want to show or hide in the list. The list updates automatically.
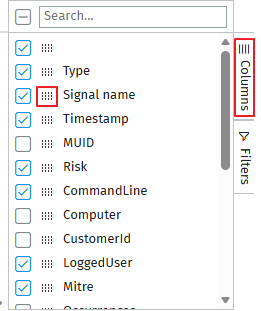
To show or hide columns in a list with the sidebar:
-
From the sidebar, select Columns. A list opens that shows all columns as they appear from left to right in the list.
-
To filter the columns in the list, in the Search text box, type the name of a column. The list updates automatically.
-
Select or clear the check boxes for the columns you want to show or hide in the list. The list updates automatically.
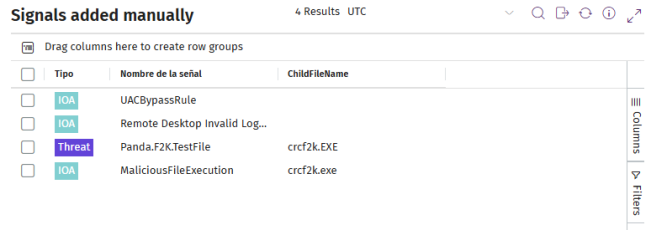
Group Rows by Columns
At the top of lists there is a bar to show row groups (1).

To group rows in a list by one or multiple columns:
-
Drag the column name to the group bar (1). In the list, a Group (2) column appears that contains the rows you grouped by the column you selected.
-
To add a second level of grouping, repeat the process. A second level of grouping appears in the Group (2) column.
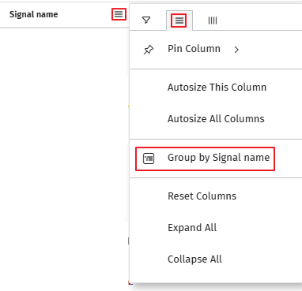
To group rows in a list with the column context menu:
-
Point to the name of the column you want to group rows by. The context icon appears (
). -
Click the icon. A drop-down menu opens that shows several tabs.
-
Select the
tab. -
Select Group by (column name)
 . In the list, a Group (2) column appears that contains the rows you grouped by the column you selected.
 -
To add a second level of grouping, repeat the process. A second level of grouping appears in the Group (2) column.
To expand or collapse the rows in a group, click the (3) and
(4) icons.
To remove a group, in the group bar, click the ![]() icon (5) for the group.
icon (5) for the group.
To change the order of groups when there is more than one group:
-
In the group bar, select the group you want to move.
-
Drag the group to a new location. The groups change order in the list.
Select All Rows in a Group
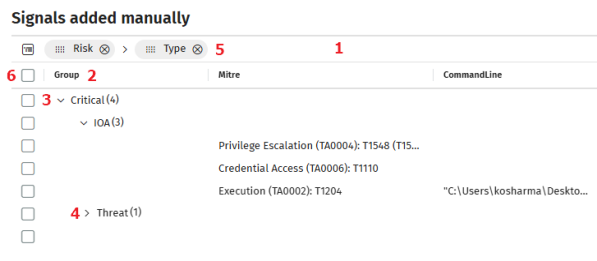
To select all rows in a group, select the check box (6) for the group.
You cannot select multiple groups of the same level at the same time. When you select a group, the console cancels the rest of the selections.
Pin Columns
In lists where there is a large number of columns, you might have to use the horizontal scroll bar to see a specific column in the list. To avoid this and pin a column to a specific position in the list:
-
Point to the name of the column you want to pin. The context icon appears (
). -
Click the icon. A drop-down menu opens that shows several tabs.
-
Select the
tab. -
Select Pin Column. A sub-menu opens. Select an option:
-
Pin Left: Pins the column to the left of the list.
-
Pin Right: Pins the column to the right of the list.
-
No Pin: Unpins the column.
Resize Columns
To change the width of a column:
-
Click the separator bar
between the column names.
-
Drag the bar left or right. The column size changes.
Autosize Columns
-
Point to the column you want to autosize. The context icon appears (
). -
Click the icon. A drop-down menu opens that shows several tabs.
-
Select the
tab. Select Autosize This Column. -
To adjust the width of all columns, select Autosize All Columns.
Filter Rows by Column Content
-
Point to the column you want to filter rows by. The context icon appears (
). -
Click the icon. A drop-down menu opens that shows several tabs.
-
Select the
 tab.
tab. -
Select a filter criterion. Depending on the type of data stored in the column, different filter criteria appear:
-
Date: Enter two dates to filter rows based on a specific time period. Enter a single date to show rows for that particular date.
-
Text: Enter the text on which you want to filter the rows in the list. From the drop-down menu, select a filter criterion.
-
Number: Enter the number on which you want to filter the rows in the list. From the drop-down menu, select a filter criterion.
-
Enumeration: Select the items on which you want to filter the rows in the list.
-
Restore Column Settings
-
Point to a column in the list. The context icon appears (
). -
Click the icon. A drop-down menu opens that shows several tabs.
-
Select the
tab. Select Reset Columns.
Search Tools
With the search tools, you can apply one search criterion across multiple columns in a list. These columns depend on the list.
To run a search on a list:
-
In the Search text box, type the text to search for.
-
Click the
icon.
-
The list shows the rows that contain texts that partially or fully match the content you typed in the text box.
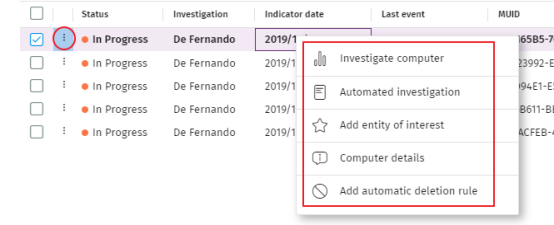
Context Menus
Some lists include rows that have context menus for quick access to frequently used tools.
To open a context menu:
-
Click the
icon.
-
Right-click the content of a field.
Computer Name to MUID Conversion Tool
Because two computers from different clients of the same SOC can have the same name, Cytomic Orion uses MUIDs to identify computers. An MUID is a string of alphanumeric characters separated by hyphens. Cytomic Orion includes a conversion tool that translates computer names into MUIDs. You can start this tool through the icon in text boxes where the console requires an MUID.

-
In the Client text box (1), enter the SOC client to which the computer belongs.
-
Enter a character from the computer name in the Search computer (2) text box. The text box (4) automatically shows the computers whose names contain the characters you entered.
-
To filter the results, use the search text box (3).
-
Select the computer and click Select. The computer MUID is copied to the text box from which you invoked the name conversion tool.
Multi-valued Text Boxes
Some text boxes support value lists you can enter manually or from the clipboard:
-
From the clipboard: Press
Ctrl + Vto paste the contents of the clipboard. List values must be separated by the "," character. -
Through the
icon in a text box: Click the
Other Controls
| Icon | Description |
|---|---|
|
|
Adds an item. |
|
|
Deletes an item. |
|
|
Changes the status (enabled or disabled) of an item. |
|
|
Refreshes the content of the associated panel. |
|
|
Exports the results shown in the associated panel to CSV format. |
|
|
In lists, it enables you to adjust dates based on the time zone selected. In text boxes, it enables you to set a time zone for searches. |