Delete Indicators Automatically
Create automatic indicator deletion rules to assign the Deleted status to indicators that meet the criteria you select and have not been previously assigned to an investigation.
Indicators marked as Deleted are placed in the Bin for seven days, after which they are permanently deleted.
Deletion rules assign the Deleted status only to new indicators. Already detected indicators are not affected by the deletion rules you might create.
Deletion Rules List
From the top menu, select Settings. From the side menu, select Deletion rules. A list opens that shows all deletion rules created so far.
| Field | Description |
|---|---|
|
Name |
Deletion rule name assigned by the analyst. |
|
Creation date |
Date the deletion rule was created. |
|
Modification date |
Date the deletion rule was last modified. |
|
Description |
Description assigned by the analyst. |
|
Hunting rule |
Name of the hunting rule that generated the indicator and description of the artifacts monitored on the client’s computer. |
|
MUID |
ID of the computer where the indicator was logged. |
|
Client ID |
ID of the client the computer where the indicator was logged belongs to. |
|
Computer name |
Name of the computer where the indicator was logged. |
|
Details |
Details field in the deletion rule. |
|
Indicator details |
Details field in the indicator. |
|
Indicators deleted in the last 30 days |
Number of indicators deleted by the rule in the last 30 days. Analysts can use this field to determine the usefulness of the deletion rule. |
|
Last deletion date |
Date and time the rule last deleted an indicator. Analysts can use this field to determine the usefulness of the deletion rule. |
Add Deletion Rules
To create a deletion rule from an indicator:
-
From the top menu, select Indicators. The indicators list opens.
-
Use the check boxes to select an indicator. Make sure you select only one indicator.
-
In the toolbar, click Add automatic deletion rule. The Add automatic deletion rule dialog box opens. The rule fields are pre-populated with values from the selected indicator.
-
In the Name text box, type a name for the rule.
-
In the Description text box, type a description of the rule (optional).
-
To configure the deletion rule criteria, see Configure Deletion Criteria.
-
Click OK. The deletion rule is added and starts to delete all new indicators that match its definition.
Configure Deletion Criteria
Cytomic Orion creates deletion rules from an existing indicator in the most restrictive way possible.
If a deletion rule has multiple defined criteria, it applies the AND logical operator between them to filter only indicators that meet all the criteria defined.
To add or remove a selection criterion from a deletion rule, select the check box for the criterion (1):
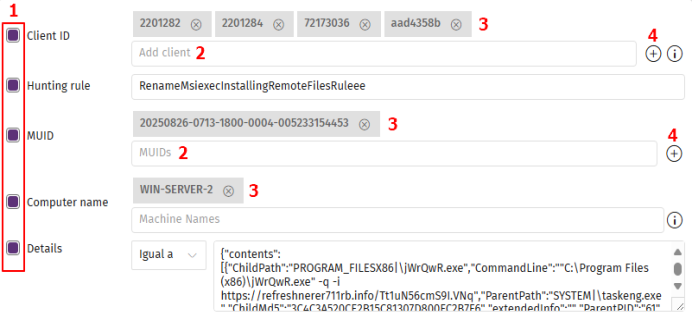
-
Client ID: IDs of the clients associated with the indicators you want to delete. All deletion rules must have at least one associated client.
-
Hunting rule: Name of the hunting rule that generated the indicators you want to delete.
-
MUID: IDs of the computers where the indicators you want to delete were found.
-
Computer name: Names of the computers where the indicators you want to delete were found.
-
Details: Specify the Details field for the indicators you want to delete.
To add items to the Client ID, Hunting rule, or MUID criteria through a drop-down menu:
-
Click the drop-down menu (2). The available items appear.
-
Select an item. It is added to the associated list of items (3).
To add items to the Client ID or MUID criteria through a list:
-
Click the
icon (4) for the criterion. The Add clients or Add computer dialog box opens.
-
To filter the list, type part of the item name in the Search text box. The list shows the items that partially match the text you typed.
-
Select the check boxes for the items you want to add.
-
Click Add. The items are added to the list (3).
To add items to the criteria through the text boxes:
-
In the text box, type the item name.
-
Press Enter. The item is added to the associated list for the criterion (3).
To delete items from the Client ID, Hunting rule, or MUID criteria:
-
Click the
icon for the item. The item is removed from the list.
To specify the Details field for an incident:
-
Click the drop-down menu (5).
-
Select Equals to define the exact content of the Details field.
-
Select Regex to define the content of the Details field more flexibly using a regular expression. For more information, see Regular Expressions.
Regular Expressions
For more information about the syntax allowed in regular expressions, see https://docs.microsoft.com/en-us/dotnet/standard/base-types/regular-expression-language-quick-reference.
To validate the regular expressions created, see http://regexstorm.net/tester.
Cytomic Orion supports RegEx C to describe flexible patterns in the Details field of indicators. As with most languages used to describe character patterns, you must escape those characters considered special or belonging to the language itself. To this end, the “\” character is used in RegEx C.
To help with the development of regular expressions, there is a preview panel which enables you to check whether the patterns you want to search for match the regular expression as you write it.
To generate a regular expression, select the RegEx option from the drop-down menu in the Details field. The content of the field updates with a regular expression that meets the content of the preview panel. All the special characters are escaped automatically by the console to make it easier for the analyst to edit the regular expression.
Example of Exclusion Created by Using Regular Expressions in the Details Field
You want to remove from the Indicators panel all executions of the net.exe tool when it tries to add the “gcch\GG_SEC_IBM_PC_Admins” user to the administrators group, because it is a frequent action but risk free.
The indicator generated by Cytomic Orion in this situation is this:
|
{ “contents”: [ { “ChildPath”: “SYSTEM|\net.exe”, “CommandLine”: “net localgroup administrators “gcch\GG_SEC_IBM_PC_Admins” /add”, “ParentPath”: “SYSTEM|\cmd.exe”, “extendedInfo”:“”, “loggedUser”: “NT AUTHORITY\SYSTEM” } ] } |
The indicator is shown in a compact format in the Details field of the Cytomic Orion console:
|
|
The regular expression that filters indicators by the content of the Details field according to the criteria established by the analyst would be:
|
|
The preview panel enables you to verify that the regular expression defined generates the character pattern that matches the content of the indicator’s Details field.
Edit Deletion Rules
-
From the top menu, select Settings.
-
From the side menu, select Deletion rules. A list opens that shows all created rules.
-
Select the deletion rule you want to edit. The Edit deletion rule page opens. See Add Deletion Rules.
Delete Deletion Rules
To delete a rule from the deletion rules list:
-
From the top menu, select Settings.
-
From the side menu, select Deletion rules. A list opens that shows all created rules.
-
Select the check boxes for the rules you want to delete.
-
In the toolbar, click Delete
. A confirmation dialog box opens.
-
Click Yes. The status of the indicators deleted by the deletion rule changes to Pending. Indicators from more than seven days ago are lost.
To delete a deletion rule associated with a specific hunting rule:
-
From the top menu, select Indicators. A list opens that shows all indicators.
-
From the side menu, click the
icon next to Bin
-
Click the hunting rule that has the deletion rule you want to delete associated to it. A list opens that shows all deletion rules associated with the hunting rule.
-
Click the
icon for the deletion rule you want to delete. A context menu opens.
-
Select Delete. A confirmation dialog box opens.
-
Click Yes. The status of the indicators deleted by the deletion rule changes to Pending. Indicators from more than seven days ago are lost.
Export the Deletion Rules List
-
From the top menu, select Settings.
-
From the side menu, select Deletion rules. A list opens that shows all created rules.
-
Click the
icon to download a CSV file with the content of the Deletion rules list. The CSV file downloads to your computer.
Change Log for Deletion Rules
To see the changes that console users have made to a deletion rule:
-
From the top menu, select Settings.
-
From the side menu, select Deletion rules. A list opens that shows all available deletion rules.
-
Select the deletion rule to see its change log. The Edit deletion rule page opens.
-
Click the
icon in the upper-right corner of the page. The Activity log dialog box opens and shows a history of all changes made by analysts to the deletion rule settings.
| Field | Description |
|---|---|
|
Name |
Name of the modified deletion rule. |
|
Description |
Description of the modified deletion rule. |
|
Modification date |
Date the deletion rule was last modified. |
|
Computer names |
Computers assigned to the modified deletion rule. |
|
Hunting rule |
Name of the hunting rule associated with the modified deletion rule. |
|
MUIDs |
Identifiers of the computers associated with the indicators to delete by the modified deletion rule. |
|
Clients |
Identifiers of the clients associated with the indicators to delete by the modified deletion rule. |
|
User |
Web console user account that modified the indicator deletion rule. |
|
Action |
|