Installation from a gold image
Be sure to follow the steps in this section closely to generate and deploy Windows images with Advanced EDR installed. If you do not follow the procedure exactly as specified, the management and protection capabilities of your product will be reduced
In large networks with many similar computers, you can automate the process to install the operating system and other software with a gold image. This is sometimes referred to as a master image, base image, or clone image. You then deploy the gold image to all computers on the network, which eliminates most of the manual work required to set up a new computer.
To generate a gold image, install an up-to-date operating system with all the software that users might need, such as security tools, on a computer on your network. When that computer is ready, you must use a virtualization software to ‘seal’ or ‘close’ the installation and deploy it to the computers on your network. For specific information about your virtualization solution, see the vendor documentation.
Supported virtual platforms
-
VMware Workstation
-
VMware Server
-
VMware ESX
-
VMware ESXi
-
Citrix XenDesktop
-
XenApp
-
XenServer
-
MS Virtual Desktop
-
MS Virtual Servers
Basic concepts and required tools
ID of VDI computers
Advanced EDR generates a unique ID in the installation process. The solution uses this ID to identify each computer in the management console.
If you install Advanced EDR once on the gold image you later copy to the computers on your network, instead of installing it individually on each computer, all cloned computers will inherit the same ID.
Having multiple computers with the same ID leads to the following negative consequences:
-
Management capabilities are reduced: The management console shows only one computer, usually the first computer that was added to it. All other cloned computers cannot be accessed from the Advanced EDR console.
-
The protection capabilities of the security software are reduced.
-
The security software stops monitoring the actions taken by processes.
To avoid having multiple computers with the same ID, you must follow a very strict protocol to generate a gold image with no ID. This protocol includes:
-
Deleting the ID from the gold image
-
Disabling the protection service
Deleting the ID from the gold image
Download the Endpoint Agent Tool free tool from the Cytomic support page (password panda):
https://www.pandasecurity.com/resources/tools/endpointagenttool.zip
Disabling the protection service
Many virtualization solutions transparently start the newly created gold image as part of the preparation and deployment process. This causes Advanced EDR to start. When the security software detects that its ID has been deleted, it generates a new ID, rendering the image unusable. To avoid this, you must disable the protection service before you close the gold image, and schedule it to be launched when the cloned computers are started.
There are multiple ways to do this: The most popular method, which we explain in this section, is through a GPO if the computer belongs to a Windows domain. If that is not the case, there are other alternative solutions:
-
Some virtualization solutions incorporate this type of tool. For example, VMware Horizon.
-
RMM solutions such as Panda Systems Management.
-
Tools such as PDQ Deploy, Sysinternals PsExec, Microsoft PowerShell, or scripts that use WMI, among others.
Enabling and disabling Advanced EDR updates
In non-persistent environments, where the storage system of cloned computers is emptied from time to time, it is important to prevent protection software updates. This can be done when you maintain the gold image, to reduce the bandwidth usage generated by cloned computers and excessive CPU usage on the host system.
To follow the procedures that enable you to successfully generate a gold image, you must assign settings profiles that enable/disable Advanced EDR updates to the computer you want to clone.
-
To enable or disable agent updates, see Communications agent updates.
-
To enable or disable protection updates, see Protection engine updates.
-
To assign settings profiles to computers, see Managing settings.
-
For more information about groups in Advanced EDR, see Group tree
Because in some scenarios you must switch between one set of settings profiles and another, we recommend that you create two computer groups in the management console: one with settings profiles that enable Advanced EDR updates and one with settings profiles that disable them. This way, to enable or disable the updates, you only have to move the computer that has the gold image from one group to another in the console.
Additionally, every time you make changes to a settings profile in the Advanced EDR console, we recommend that you follow this procedure to make sure that the computer used to generate the gold image receives the new settings:
-
Move the computer to the relevant group so that it inherits the new settings.
-
In the notification area of the Windows taskbar, right-click the Advanced EDR icon. A drop-down menu appears.
-
Select Synchronize. This downloads the new security settings from the server to the target computer.
Creating and deploying a gold image in persistent VDI environments
Steps to take on the computer where the gold image is generated
-
Install an updated version of the operating system and all programs that users might need.
-
Make sure the computer is connected to the Internet and the MAC address of the computer’s network card is static.
-
Install Advanced EDR on a group with updates enabled by following the steps described in Generating the installation package and manual deployment.
-
Open the Endpoint Agent Tool. Select the checkboxes for Detections, Counters, and Check commands. Click the Send button.
-
Make sure the Is a Gold Image option is not selected.
-
If the device is protected by the anti-tamper protection, enter the password.
-
Click Prepare image.
-
Disable the Panda Endpoint Agent service.
-
Turn off the computer and generate the gold image with your virtual environment management software.
Steps to take to enable the protection service
Follow this procedure to enable the Panda Endpoint Agent service on computers cloned through a GPO:
-
In the GPO settings, browse to Computer Configuration, Policies, Windows Settings, Security Settings, System Services, Panda Endpoint Agent.
-
The service appears as Disabled. Change it to Automatic.
For more information about GPOs, see https://www.microsoft.com/en-us/download/details.aspx?id=21895 .
Creating, deploying, and maintaining a gold image for non-persistent VDI environments
Steps to take on the computer where the gold image is generated
-
Install an updated version of the operating system and all programs that users might need.
-
Make sure the computer is connected to the Internet.
-
Install Advanced EDR on a group with updates disabled by following the steps described in Generating the installation package and manual deployment.
-
Move the computer to a group that has updates enabled.
-
If the persistence of the cloned computers is set to be less than one week, it is recommended (although not strictly necessary) to preload the Advanced EDR caches. Follow one of these two procedures:
-
Open the Endpoint Agent Tool. Select the checkboxes for Detections, Counters, and Check commands. Click the Send button.
-
Make sure the Is a gold image checkbox is selected.
-
If the device is protected by the anti-tamper protection, enter the password.
-
Click Prepare image.
-
Disable the Panda Endpoint Agent service.
-
Turn off the computer and generate the gold image with your virtual environment management software.
Steps to take in the Advanced EDR management console
-
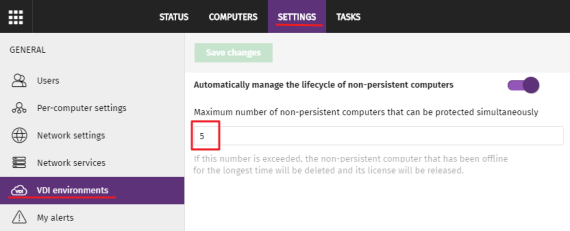
Click Settings in the top menu. Click VDI environments from the side panel.
-
Configure the maximum number of non-persistent VDI computers that can be active simultaneously.
Steps to take to enable the protection service
Follow this procedure to enable the Panda Endpoint Agent service on computers cloned through a GPO:
-
In the GPO settings, browse to Computer Configuration, Policies, Windows Settings, Security Settings, System Services, Panda Endpoint Agent.
-
The service appears as Disabled. Change it to Automatic.
For more information about GPOs, see https://www.microsoft.com/en-us/download/details.aspx?id=21895 .
Maintaining the gold image in a non-persistent VDI environment
Because the security settings that VDI computers receive have updates disabled, we recommend that you update the gold image manually at least once a month. This makes sure that the VDI computers receive the latest version of the protection and the signature file. To manually update the gold image in a non-persistent VDI environment:
-
Make sure the computer is connected to the Internet.
-
Move the computer to a group that has updates enabled.
-
Updates are performed silently in the background. We recommend you wait a few minutes to make sure the image is properly updated. If a new version of the protection is available, a restart window is displayed and the computer restarts automatically. When the restart is complete, we recommend you force a new synchronization to make sure Advanced EDR is fully up to date.
-
Preload the Advanced EDR caches. Follow one of these two procedures:
-
Open the Endpoint Agent Tool. Click the Start cache scan button and wait for the process to complete.
-
Or
-
Right-click the Advanced EDR icon on the Windows taskbar.
-
Click Advanced protection.
-
Click the Scan now button and wait for the process to complete.
-
-
Open the Endpoint Agent Tool. Select the checkboxes for Detections, Counters, and Check commands. Click the Send button.
-
Make sure the Is a gold image checkbox is selected.
-
If the device is protected by the anti-tamper protection, enter the password.
-
Click Prepare image.
-
Turn off the computer and generate the gold image with your virtual environment management software.
-
In the VDI environment, replace the previous image with the new one.
-
Repeat this maintenance process at least once per month.
Verifying that all computers are cloned correctly
There is not a single way to verify that computers are cloned correctly in all possible scenarios. The following is a minimum checklist of items to check.
Show persistent and non-persistent VDI computers
The presence of a number of VDI computers in the Advanced EDR management console lower than the number of VDI computers actually installed on the IT network is a symptom of not having followed the procedure to generate gold images correctly. This can severely affect the management and protection capabilities of your security product.
To view a list of non-persistent VDI computers:
-
Go to the Settings menu at the top of the console. Click VDI environments from the left panel. Click the Show non-persistent computers link.
-
The Computers list shows only non-persistent computers.
To view a list of persistent VDI computers:
-
Select the Computers menu at the top of the console. Click the folder icon
 in the left panel. The filter tree appears.
 -
Click the All root node. The right panel shows all computers added to the Advanced EDR console.
-
Verify that all persistent computers are included in the list.
Verify the status of Advanced EDR updates on cloned computers
-
Select the Computers menu at the top of the console. Click the folder icon
in the left panel. The filter tree appears. -
Find persistent and non-persistent computers in the right panel.
-
Click the name of each cloned computer. A page opens that shows the computer details.
-
Select the Settings tab. A page opens that shows the settings profiles assigned to the computer.
-
Verify the Per-computer settings and Security for workstations and servers profiles have the correct values:
-
For persistent computers, updates must be enabled.
-
For non-persistent computers, updates must be disabled.
-