Creating and managing settings profiles
From the top menu Settings, you can:
Before you save changes to a settings profile, make sure they are correct. If the Enable real-time communication option is selected, the settings profile is immediately sent to the target computers. See Configuring real-time communication.
To manage a settings profile, your user account must have the appropriate permission for the profile. See Understanding permissions.
To manage recipients for a settings profile, your user account must have visibility of all target computers. See Managing roles and permissions
Settings profiles created by service providers in CYTOMIC Nexus show with a green CYTOMIC Nexus label. When you point to a settings profile created by and inherited from a service provider, this message appears: “These settings are managed from CYTOMIC Nexus”. This type of settings profile is read-only and you can edit only its recipients.
See Security product settings in the CYTOMIC Nexus guide.
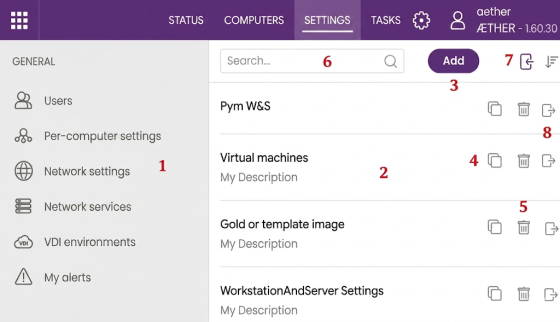
Create settings profiles
-
From the top menu, select Settings.
-
From the side menu (1), select the type of security settings you want to create a profile for. A page opens and shows the available settings profiles.
-
Click Add (3). The Add settings page opens.
-
In the Name text box, type a name for the settings profile. In the Description text box, type a description of the profile.
-
To select the target computers, see Assigning a settings profile from the profile
-
Configure the settings of the profile.
-
Click Save. The profile is saved and sent to the target computers.
List and sort settings profiles
To review settings profiles, your user account must have at least read permissions for the relevant type of profile. See Understanding permissions.
-
From the top menu, select Settings.
-
From the side menu (1), select the type of settings profiles you want to list. A page opens and shows the available settings profiles.
-
Click the
 icon (7) to expand a context menu with the available sort options:
-
Sorted by creation date
-
Sorted by name
-
Ascending
-
Descending
-
-
To search for a settings profile, type a search keyword in the Search (6) text box. Press Enter or click the
 icon. The console filters the list by name or description.
Copy settings profiles
-
From the top menu, select Settings.
-
From the side menu (1), select the type of settings profile you want to copy. A page opens and shows the available settings profiles.
-
Click the
 (4) icon for a profile. All settings are copied, except for the content of the Recipients field, which is left empty.
Edit settings profiles
-
From the top menu, select Settings.
-
From the side menu (1), select the type of settings profile you want to edit. A page opens and shows the available settings profiles.
-
Select the settings profile you want to edit. The Edit settings page opens.
-
Configure the settings.
-
Click Save. The profile is saved and sent to the target computers.
Delete settings profiles
You cannot delete a settings profile that is assigned to a device or computer.
-
From the top menu, select Settings.
-
From the side menu (1), select the type of settings profile you want to delete. A page opens and shows the available settings profiles.
-
Click the
 icon (5) for the profile you want to delete. A confirmation dialog box opens.
 -
Click Delete. The settings profile is deleted.
Export and import settings profiles
To streamline account migration processes, you can export individual settings profiles to JSON files on your computer and import them into another customer account.
Each JSON file contains all parameters in the settings profile except for recipients and passwords or QR codes. It also includes a signature to verify the integrity of the file and prevent manual modification.
You can import settings profiles from earlier or later versions of the security product. The console ignores fields that are unspecified or unknown.
To export a settings profile, your user account must have the permission to view that type of settings profile. To import a settings profile, your user account must have the permission to create that type of settings profile. See Understanding permissions.
To export a settings profile:
-
From the top menu, select Settings.
-
From the side menu (1), select the type of settings profile you want to export. A page opens and shows the available settings profiles.
-
Click the
 icon for the settings profile you want to export. A dialog box opens for you to select a destination folder on your computer.
 -
Click Export. The JSON file downloads to the selected folder and an entry is added to the User Actions log. See User actions log.
To import a settings profile:
-
From the top menu, select Settings.
-
From the side menu, select the type of settings profile you want to import. A page opens and shows the available settings profiles.
-
Click the
 icon (7). The Import dialog box opens.
 -
Click the Select file link. A dialog box opens for you to select the file you want to import.
-
Click Import. The console shows the settings profile you loaded.
-
Click Save. The settings profile is created in the console.