Investigations list
For an investigation to appear in the Investigations list, the user account you use to log in to Cytomic Orion must have visibility of all clients associated with the investigation. See Client Visibility Settings.
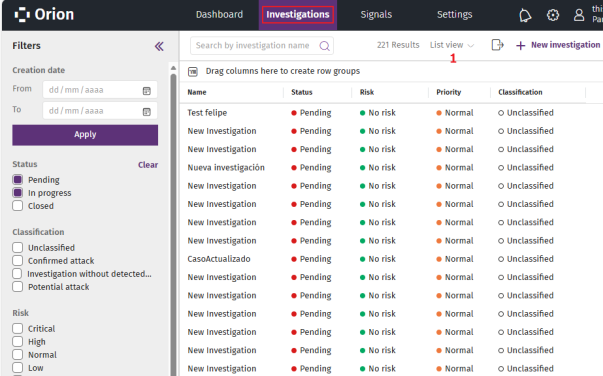
To view the Investigations list:
-
From the top menu, select Investigations. A list opens and shows all investigations with a Pending or In progress status.
-
To find a specific investigation, see Configure and Filter the Investigations List.
-
To change the list view to cards mode, see Cards View.
-
For more information about the fields in the list, see Fields in the Investigations List.
-
To export the Investigations list:
-
If the cards view is enabled, click Cards view (1) and select List view.
-
Click the
icon. A CSV file downloads to your computer. This file contains the visible columns in the list.
-
Configure and Filter the Investigations List
The Investigations list stores, in your user session, the filtering criteria you select to apply them every time you view the list.
If you select more than one filtering criterion, the list applies the logical operator OR between the criteria.
To filter the Investigations list:
-
If the left panel is not expanded, in the upper-left corner of the page, click the
icon. The left panel expands.
-
To show the investigations created within a time interval:
-
In Creation date (1), enter a start date and an end date in the From and To text boxes, or click the
 icons to select the dates from the drop-down calendars.
 -
Click Apply. The list updates to show the investigations created in the interval you defined.
-
-
To show investigations based on their current status:
-
In Status (2), select the check boxes for the statuses of the investigations you want to show in the list (Pending, In progress, or Closed).
-
To remove the filter, click Clear (3).
-
-
To show investigations based on the classification of the attack:
-
In Classification (4), select the check boxes for the classification of the investigations you want to show in the list (Unclassified, Confirmed attack, Investigation without detected attacks, Potential attack).
-
To remove the filter, click Clear (3).
-
-
To show investigations based on the potential risk to clients’ assets:
-
In Risk (5), select the check boxes for the risk levels assigned to the investigations you want to show in the list (Critical, High, Normal, Low, No risk).
-
To remove the filter, click Clear (3).
-
-
To show investigations based on their priority:
-
In Priority (6), select the check boxes for the priority levels of the investigations you want to show in the list (Critical, High, Normal, Low).
-
To remove the filter, click Clear (3).
-
-
To show all investigations assigned to a specific user:
-
In Assigned to (7), click the Add user text box. A list opens and shows all console users.
-
Select a user. The user is added to the list above the text box, and the Investigations list shows the investigations assigned to the user.
-
To remove a user from the list, click
. The list updates automatically.
-
To remove the filter, click Clear (3).
-
-
To show all investigations created by a specific user:
-
In Created by (8), click the Add user text box. A list opens and shows all console users.
-
Select a user. The user is added to the list above the text box, and the Investigations list shows the investigations created by the user.
-
To remove a user from the list, click
-
To remove the filter, click Clear (3).
-
-
To show all investigations related to a client:
-
In Clients (9), click the Add client text box. A list opens and shows all clients managed by the SOC.
-
Select a client. The client is added to the list above the text box, and the Investigations list updates automatically.
-
To add multiple clients at the same time, copy and paste the clients separated by commas from a text file.
-
To remove a client from the list, click
-
-
To configure the list when it is in list view, see List Configuration Tools.
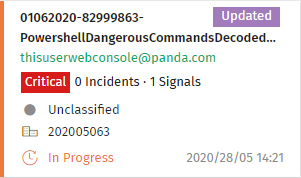
Fields in the Investigations List
| Field | Description |
|---|---|
|
Assigned to |
User account assigned to the investigation. |
|
Classification |
Classification of the attack contained in the investigation:
|
|
Clients |
Identifiers of the clients associated with the investigation. |
|
Created by |
User account that created the investigation. The account is SYSTEM if the investigation was automatically created by Cytomic Orion. |
|
Description |
Investigation summary. |
|
Status |
Investigation status:
|
|
Creation date |
Date and time when the analyst created the investigation. |
|
Incidents |
Total number of incidents in the investigation. |
|
Name |
Investigation name. If Cytomic Orion adds an incident automatically to the investigation, the Automatic label shows until the user assigned to the investigation accesses its content. |
|
Priority |
Priority level for the investigation.
|
|
Risk |
Potential risk of the detected malicious activity for the client’s assets.
|
|
Signals |
Total number of signals assigned to the investigation (both signals added manually and signals included in the incident). |
Cards View
The cards view provides a summary of each investigation created.
To enable the cards view:
-
Click the
icon. A drop-down menu opens.
-
Select Cards view. The list changes to cards view.
-
To sort the cards:
-
In the upper-right corner of the page, click the
icon. A list of sorting criteria opens.
-
Select a sorting criterion. The list updates automatically.
-
-
For more information about the details in each card, see Card Fields.
Card Fields
| Field | Description |
|---|---|
|
Name |
Investigation name. If Cytomic Orion adds an incident automatically to the investigation, the Automatic label shows until the user assigned to the investigation accesses its content. |
|
Priority |
Priority level for the investigation.
|
|
Created by |
User account that created the investigation. This appears in green if it matches the user account with which you logged in to the console. Otherwise, it appears in gray. The account is SYSTEM if the investigation was automatically created by Cytomic Orion. |
|
Assigned to |
User account assigned to the investigation. |
|
Incidents |
Number of incidents assigned to the investigation. |
|
Signals |
Total number of signals assigned to the investigation (both signals added manually and signals included in the incident). |
|
Classification |
Classification of the attack contained in the investigation:
|
|
Clients |
Identifiers of the clients associated with the investigation. |
|
Status |
Investigation status:
|
|
Creation date |
Date and time when the analyst created the investigation. |
|
Description |
Investigation summary. |
|
Risk |
Potential risk of the detected malicious activity for the client’s assets. The investigation risk level is the same as the value of the highest risk level of the signals detected:
|