Advanced SQL Query Panel
For more information about SQL statements supported by Cytomic Orion, the type of data supported, and the available functions, see Advanced Query Module SQL Syntax.
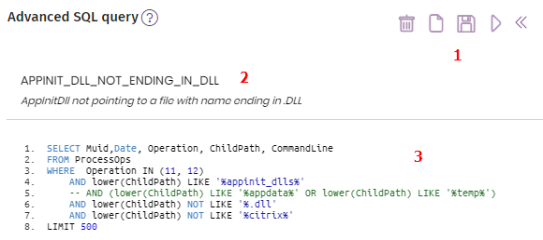
This panel enables you to create SQL statements from scratch or edit previously saved SQL statements. It contains these elements:
-
Query management bar (1): Enables you to delete, run, stop, and save existing queries.
-
Query name and description (2).
-
Query creation panel (3): Enables you to create a new query or edit an existing query. Every line is numbered. Additionally, the console highlights the SQL language syntax (keywords, reserved symbols, etc.) as well as character strings in blue to make reading SQL statements easier.
Query Management Bar (1)
This bar enables you to perform actions to manage queries. It shows these icons:
-
Delete query
: Deletes the saved query created by the SOC analyst and selected in the library panel. You cannot delete queries predefined by Cytomic.
-
Clear query
: Deletes the content of the Advanced SQL query panel.
-
Save query
: When you click this icon, a dialog box opens where you can enter the query name and the tactic and technique it will belong to in the group tree. Click OK. The query is added to the repository of saved queries. For more information about how to view the queries created by the MSSP/MDR vendor analysts, see Saved (3).
-
Send query
and Stop query
: These icons enable you to run and stop the execution of the query shown in the Advanced SQL query panel. Syntax and communication errors appear in the results panel. You can also run a query by pressing Control + Enter on your keyboard. See Results Panel (3).
Results Panel (3)
This panel shows query results in table format and indicates whether there are syntax errors in the SQL statement or problems with the server For more information about how to filter and search for data within the table, see List Configuration Tools.
The results panel provides these tools:
-
Search
: You can type only a partial string. Searches are performed on the content of all fields returned by the SQL statement.
-
Results: Indicates the number of results shown by the SQL statement.
-
Time zone: Set the time zone for date fields and for the content of searches.
-
Export
Context Menu Associated with Result Tables
When you right-click an item in the table, a context menu opens that shows different options that enable you to quickly access other areas of the console:
| Option | Description |
|---|---|
|
Investigate computer |
Requires the MUID and DateTime fields. It opens the investigation console to show the events logged on the selected computer, on the specified date. |
|
Add entity of interest |
Marks an entity to show it in the Entities of interest sub-panel in the associated investigation to rapidly access the information. |
|
Show computers with parent file |
Requires the ParentMD5 field. It searches for computers with events that match the value entered in the ParentMD5 field. See File Investigation: MD5. |
|
Show computers with child file |
Requires the ChildMD5 field. It searches for computers with events that match the value entered in the ChildMD5 field. See From a Newly Created or Ongoing Investigation. |
|
Automated investigation |
Shows a lists of all notebook templates created. When the analyst opens a template, Cytomic Orion automatically populates all compatible parameters in the template with the results of the selected row. See Investigations with Notebooks. |
|
Computer details |
Shows information about the computer. Requires the MUID field. |