Manage Signals from the Incident Details Page
To view detailed information about an incident:
-
In the top menu, select Investigations. A list opens and shows all investigations.
-
To find a specific investigation, see Configure and Filter the Investigations List.
-
Select an investigation. A page opens and shows the investigation information, incidents, and signals.
-
For more information about the fields in the Incidents list, see Incidents List.
-
To view details for an incident, in the Incidents section, click the Show Details button for the incident. The Incident Details page opens.
From the Incident Details page, you can:
Review Signal Details
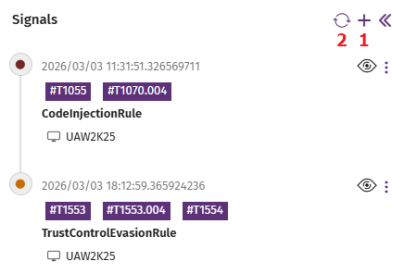
The left panel lists the signals included in the incident, in chronological order.
Each signal provides information about the tactics, techniques, and procedures (TTPs) used in the cyberattack, according to the MITRE ATT&CK framework.
-
Tactic: The tactical objective of the attacker.
-
Technique: The method that the attacker uses to achieve a tactical objective.
-
Procedure: The specific implementation of the techniques.
TTPs describe attacker behavior to facilitate detection and mitigation. They provide a detailed analysis of attacker activities compared to simpler indicators (IP addresses or files).
Each signal includes:
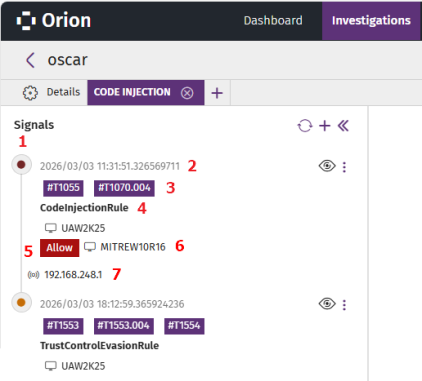
-
(1) The risk level icon:
-
Dark red: Risk levels 9 and 10.
-
Red: Risk levels 7 and 8.
-
Orange: Risk levels 4, 5, and 6.
-
Gray: Risk levels 1, 2, and 3.
-
Green: No risk.
-
-
(2) The date and time when the signal was detected, with nanosecond precision.
-
(3) The MITRE technique, tactic, and procedure, when the information is available.
-
(4) The name of the signal defined by Cytomic Orion.
-
(5) The action taken by Cytomic Orion. See action.
-
(6) The name of the affected device.
-
(7) The remote IP address of the computer, when the information is available.
To view details about a signal:
-
In the left panel, select the signal.
-
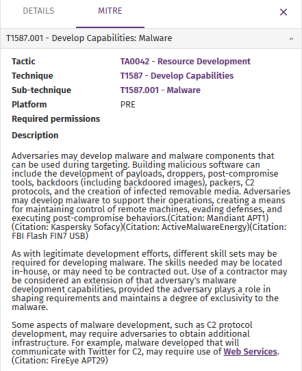
In the right panel, select the Details tab. See View Information for Signals.
-
In the right panel, select the MITRE tab. The tab shows the TTPs associated with the signal, and a detailed explanation of how they work. The MITRE tab only shows when the signal has MITRE techniques and sub-techniques assigned.
-
Add Signals to the Incident
To add signals to an incident, your user role must have the Manage signals in incidents permission. For more information about roles and permissions, see Understanding Permissions.
To manually add signals that are not part of the incident:
-
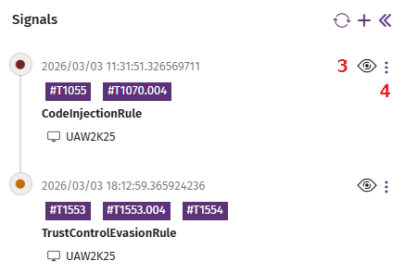
In the Signals panel, click the
icon (1). The Add Signals dialog box opens. For more information about the fields in the Signals list, see Fields in the Signals List.
-
To update the Signals list to show the new signals that Cytomic Orion has detected since you opened the incident, click
(2). The list updates and shows all detected signals.
-
Select the check boxes for the signals you want to add.
-
Click OK. The list closes and the incident updates:
-
The left panel includes the new signals you selected, in chronological order.
-
The central panel includes the assets involved in the signals that are not hidden. See Show, Hide, and Delete Signals.
-
Show, Hide, and Delete Signals
To manually delete signals from an incident, the user account you use to log in to Cytomic Orion must have the Manage signals in incidents permission assigned to its role. For more information about roles and permissions, see Understanding Permissions.
You can only delete signals that you added manually. You can hide any type of signal.
To hide a signal:
-
Click the
 icon (3). In the list, the signal grays out. Also, the entities of interest associated with the signal are removed from the incident graph if they are not related to other signals included in the incident.
To hide all signals related to an entity of interest:
-
In the Incident graph central panel, right-click the entity of interest to hide all related signals. A context menu opens.
-
Select Hide related signals. In the Signals left panel, all signals related to the entity of interest gray out.
To delete a signal from the incident:
-
Click
(4) next to the signal you want to delete. A context menu opens.
-
Click the
icon. The signal disappears from the left panel. Also, the entities of interest associated with the signal are removed from the incident graph if they are not related to other signals included in the incident.
View the Processes That Generate Signals
In the Signals left panel, select a signal to show the sequence of events that generated the signal, the signal, and its severity.
The Cytomic Orion process tree includes processes logged up to seven days before the signal was generated.
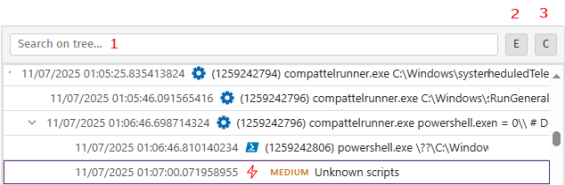
To show the processes that generated a signal:
-
In the left panel, select a signal. The central, right, and lower panels update to show information about the signal.
-
The lower panel shows one line for each parent process-child process pair created. You can expand the hierarchy of child processes for each branch of the tree.
-
To filter processes in the tree, in the Search in tree text box (1), type a command line. The tree shows only processes that contain the text you entered.
-
To expand all child processes in the tree, click (2)
 .
. -
To collapse the tree and show only parent processes, click (3)
 .
. -
For information about a process creation event, select the process. The right panel updates to show information for the process. For more information about each field, see Fields of Logged Events.
-
To review information about the signal, select the process tree line with the
 icon. The right panel updates to show information for the signal. See View Information for Signals.
The information shown in each line of the process tree is:


| Field | Description |
|---|---|
|
|
|
|
Date and time (2) |
Date and time (in nanoseconds) when the child process was created or the signal was logged. |
|
Icon (3) |
Parent process type or icon that indicates the signal was generated. |
| Identifier (4) |
Parent process identification number. |
| Parent process (5) |
Parent process name. |
|
Child process (6) |
Child process name and parameters it receives. |
| Severity (8) |
Severity of the signal:
|
|
Name (9) |
Name of the signal. |
Run Analysis Tools
To analyze the telemetry data associated with a signal:
-
In the Signals left panel, click
-
Select an analysis tool:
-
Investigate computer
 : Opens the investigation console and shows the events included in the signal. See Investigation Console Structure.
 -
View activity graph: Shows a graph that provides a visual representation of the events included in the signal. See Graphs.
-
Computer details
 : Shows information about the computer. See Computer Details.
-
Automatically Delete Signals
You can create automatic deletion rules only for IOA signals.
Create an automatic signal deletion rule to prevent Cytomic Orion from logging a specific signal on a specific computer.
-
In the Signals left panel, click
-
Select Do not detect again. The Add automatic deletion rule dialog box opens.
-
In the Name text box, type a new name for the rule.
-
In the Description text box, type a description of the rule (optional).
-
To set the deletion criteria, see Configure Criteria for Signal Deletion Rules.
-
Click Do not detect again
 . The deletion rule is created and begins moving new signals that meet the criteria defined in the rule to the recycle bin.